
2.1.6 Camera monitoring
Probably not relevant for Palau at this point.
Camera monitoring has become a critical element of many seabird monitoring projects in recent years, thanks to improvements in technology. Cameras have become better designed to withstand the rigours of the field and to have longer battery life and larger memory capabilities. Improved trigger sensors (both in terms of sensitivity and speed), higher quality photos and videos, increased programming options, and infrared night vision capabilities have greatly enhanced our ability to obtain data for seabird projects. Cameras can be utilised in multiple ways in seabird studies:
- Obtaining data (including burrow attendance, phenology, and fledging) from nocturnal burrowing Procellarid species where it may not be possible to access the burrow chamber itself
- Assessing the presence of cryptic species by deploying cameras in areas where it is possible they exist but are not yet confirmed
- Taking photos of large seabird colonies of surface or cliff-ledge-nesting species at regular intervals to assess population changes over time
- Identifying predators that are impacting on study species and utilising this information to help guide management actions
- Outreach opportunities, by sharing images and videos captured on cameras to social media or news outlets to help the public establish an emotional response with the birds
Used correctly, cameras can collect a huge wealth of data while minimising human disturbance
Choice of camera
There are a lot of camera options out there, and it can be quite overwhelming to figure out which camera you should be using. There are several considerations that should be taken into account before you decide to purchase cameras for your project. These considerations are as follows:
- Cost, bearing in mind that the cheapest is never the best quality!
- Durability, particularly waterproofing (if using in rainy or foggy environments)
- Trigger speed capabilities, particularly important for catching images of fast-moving species.
- Night vision capabilities, for nocturnal species. In these scenarios it is very important to find a camera with good quality infrared night vision with no ambient glow - clearly you do not want bright flashes or any form of light going off when the camera is taking a photo.
- How quiet is the camera? Some cameras create a sound when a photo is being taken, which can startle a bird approaching or potentially attract a curious predator, such as a cat.
- Photo quality, as not all cameras are created equal!
- Programming options (i.e. can it be set to turn on and off for periods?)
- Video, sound and high-definition imagery capabilities – particularly important if you want to use photos or videos for outreach work.
- Length of warranty, as you will be putting the camera through its paces in the field!
- Repair service options – how easy is it to send a unit back to the company to repair it?
- Get advice. The Pacific Seabird Advisory Group has been set up for this reason (see Section 5.2).
Methods
There are several considerations for deploying cameras in seabird colonies. Cameras can be a source of disturbance, so in surface-nesting seabird colonies, cameras should be deployed before birds return to the colony. Ideally, they would then be left out for the whole season until the birds have left (or at least until chicks have hatched) so ensuring the cameras are set to a lower number of photos per trigger, longer quiet periods, have larger capacity SD cards and on-off periods (if you only want to record activity during the day or night) will conserve battery life and memory space. Likewise for cameras in front of burrows make sure they are not too close to the burrow mouth or on an obvious ingress route – you don’t want to block the bird from getting in, or dissuade it from entering its burrow in any way! For motion-activated settings for cameras used on burrowing species, the best position is for the camera to be facing directly into the burrow.
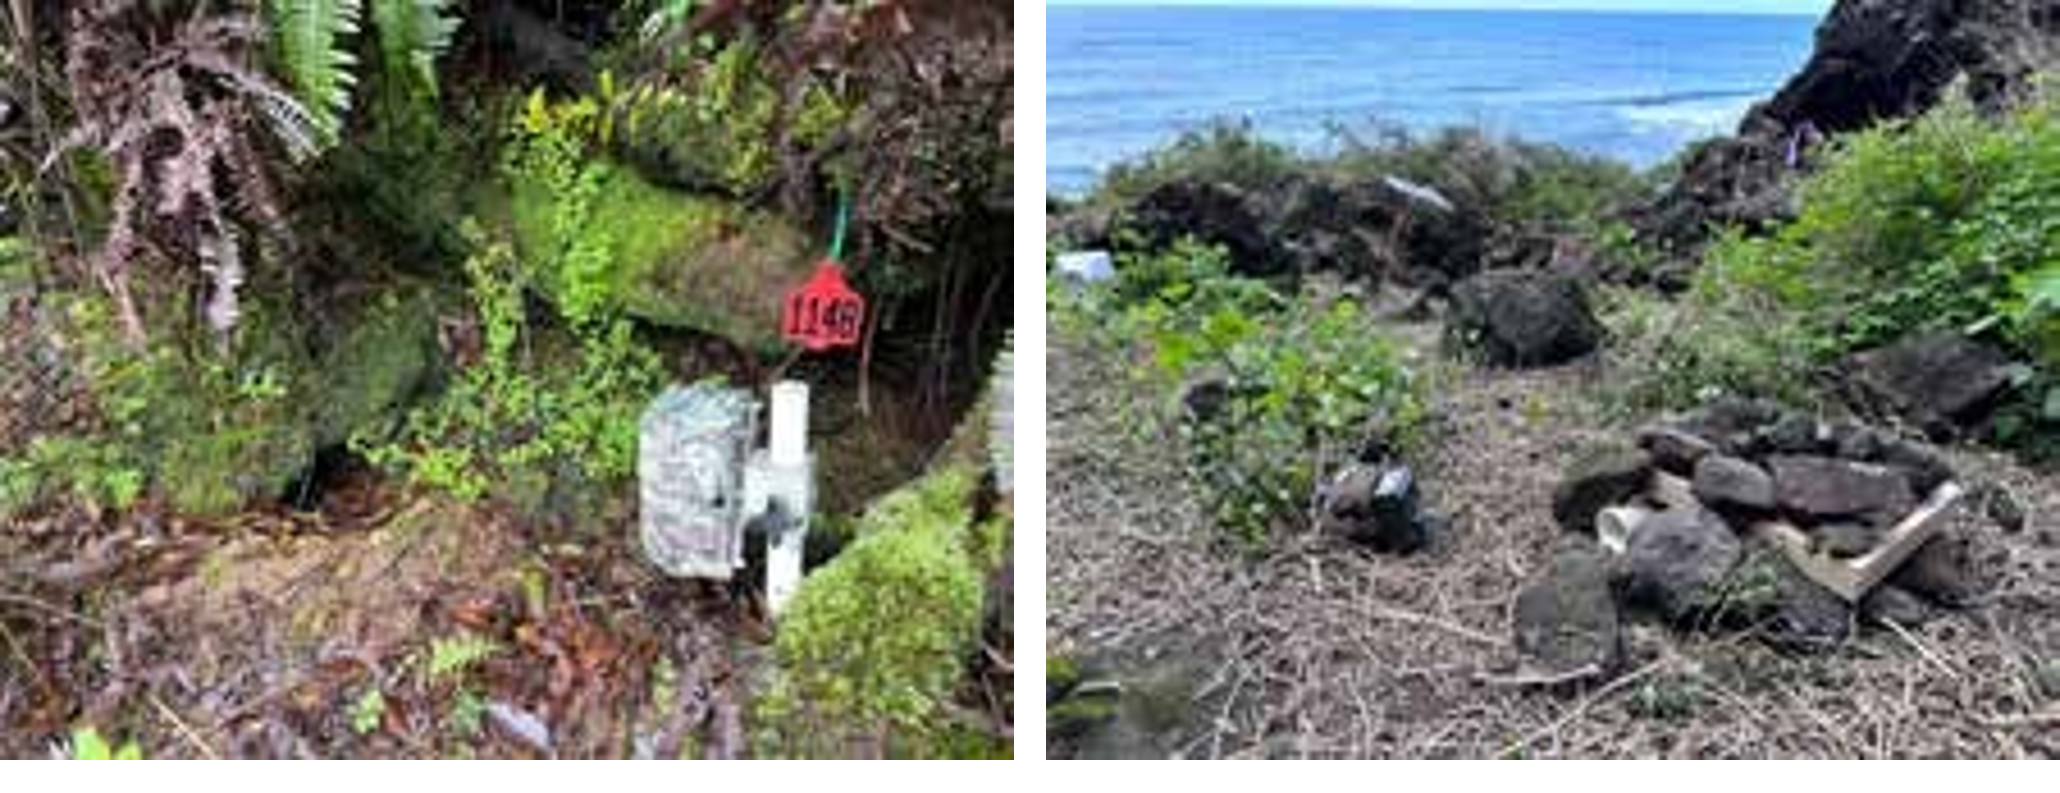
Figure 39. Examples of camera deployments. Left, pole mounted in front of a petrel burrow in wet montane forest. Right, on the ground at a social attraction site in a rocky habitat. Photos: André Raine
Mounting the camera is also a factor. If you are in an area with deep soil, a pole can be sunk into the ground and then the camera mounted on the pole (make sure the pole is secure however and will not fall over or become wobbly). On hard or rocky terrain, cameras can be strapped to rocks or bushes and trees that are unlikely to move in strong winds. Make sure the camera is pointing directly at where you want it to collect data – some cameras have a walk test feature that allows you to see if it will trigger when something moves in front of it (simulated by moving your hand in the area where the bird is likely to pass and seeing a red blinking light on the camera). If the camera does not have this capability, set it up, arm it and then move your hand in the area where the bird will be. You can then open the camera back up afterwards and check the images to see if the camera is properly orientated. Remember there is a balance in setting up cameras. If you set it up too close, the images become blurry, and you run the risk of missing some of the action. Too far and you may find the camera is taking photos of moving vegetation and shadows and missing the bird itself.
When setting up a camera in a wet environment, make sure the camera is not positioned in a way that will increase its chances of being impacted by the weather (water and moisture is not your camera’s friend!). Do not have the camera sitting on the ground as water may pool around it and seep in. Likewise, do not have it sitting directly under an overhang or branch where water will funnel down onto your camera. Some cameras have excellent waterproofing, but there is a limit to how much they can take before they start malfunctioning. You could also consider putting a shelter (like half a rain gutter) over the top of the camera to reduce the amount of direct water it receives. Lastly, when checking your camera in wet environments (i.e., changing SD cards or batteries) make sure you shelter the inside of the camera from rain – even if it is only light rain. Use a raincoat or your body to shield the camera’s insides as you do whatever it is you have to do.
False triggers are also a big issue with cameras – they can result in thousands of images of a branch moving (making for extremely tedious viewing!), meaning your SD card fills up and your battery drains more quickly. To minimise this issue there are several things you can do. Firstly, some cameras allow you to reduce the sensitivity of the trigger or set certain points in the camera’s field of view where movement will not trigger it. Secondly, make sure there is no vegetation in the way that will move and cause the camera to fire. Clip bits of grass, twigs and leaves out of the view of the camera, but make sure you do not do unnecessary or over-exuberant trimming as the vegetation may be important cover for the bird. Lastly, be aware of what is around the camera. Are there certain areas where there is a lot of bird movement that you aren’t interested in (like a booby nest on a shrub to the side of a shearwater burrow)? If so, make sure the camera isn’t positioned so that it catches non-target movement. Shadows and clouds can also trigger cameras, so be aware of that as well if part of the camera’s view is sky.
If you are deploying cameras in an area where you are trying to ascertain whether a species is present or not, or if there are predators lurking about in your management area, use your knowledge of the species to help guide where you deploy the camera. Look for good breeding habitat, open areas where prospectors (birds seeking burrows or mates) may court or socialise, well-used trails and areas with seabird sign present (guano, digging, footprints etc.). All of these factors can help increase the chances that you will catch something important on camera. In these kinds of studies, the more cameras you deploy the better – each camera increases your odds of confirming presence!
Analysis of data
Cameras can produce a LOT of images, and the more units you deploy the larger your image database becomes. This means more data, but it also means more time spent reviewing and rapidly increasing costs of storing all of this data. Furthermore, you may find that at certain times of the year you get more images than others (for example, on a burrow camera where a chick spends hours exercising outside the burrow entrance in front of your camera). Even if a camera only takes 1,000 images over your study period, if you have 15 cameras out, that is still 15,000 images to review. Burrow cameras can take a lot more than that; over 40,000 photos in a month!
Tree-nesting species can give 30-35,000 triggers in a month at any time of the season as adult birds are often present for extended periods of time each and every night.
To analyse camera data, decide what it is you actually need. There is a tendency to want to digitise everything you can from your photos, which is great if you have a lot of time and capacity. But as you start getting overwhelmed with the volume of data, decide whether you really need it all. Do you need to digitise a photo every time a bird enters the burrow, or can you get away with digitising first arrival of the season, first emergence of chick and fledge date? Artificial Intelligence (A.I.) is also becoming more popular for photo review, with the A.I. trained on recognising target species and then digitising sightings for you. This can be really useful for getting through vast numbers of photos. However, be aware that A.I. is never going to be as good as a human reviewer and will miss things, so again an assessment of what you need the data for is going to be key. For example, if you are digitising the number of rats visiting a seabird burrow and there is a lot of rat action, the A.I. missing a few rats is not going to be a major issue. However, if you have eradicated rats from a site and want to monitor for re-invasion, missing a single rat could be catastrophic. Lastly, if you do not mind publicly sharing your photo database, you can also create an internet-based system where you ask volunteers to view photos online and digitise the data for you. This approach has been successfully used by some projects, although carrying out quality control checks will be important.
Camera brands
These include Reconyx (https://www.reconyx.com/), Bushnell (https://www.bushnell.com/), Spartan (https://go.spartancamera.com/), Cuddeback (https://www.cuddeback.com/), Browning (https:// browningtrailcameras.com/), and GardePro (https://gardeproshop.com/). Swift Enduro cameras have been used in the subantarctic, recording over a year of data in often very wet/foggy weather (https:// outdoorcameras.com.au/shop/swift-enduro/)